Sunday 31 May 2015

Pottering On

Pottering On and Potting On

If, like me, you don’t currently have a usable greenhouse, you might find yourself potting up seedlings on the kitchen counter instead. Also like me, you might not enjoy the prospect of getting compost everywhere – and using a sheet or two of newspaper doesn't always seem to help. Somehow that compost finds its way off the edge of the paper and onto your floor, or counter top, or anywhere else it chooses. So what to do?

I came up with a simple solution that anyone can use. My dog food arrives in bulk, packed neatly in small boxes, so I frequently have a small box or two lying around waiting for recycling. I decided to use one of these to create a makeshift potting bench, with sides. I simply cut down the front and covered the bottom of the box with newspaper to avoid compost escaping through the cardboard flaps at the bottom of the box – and voila! A usable box that keeps the compost in one place.


PICTURE OF POTTING BENCH

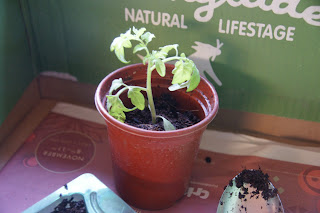
Amongst the many pots and trays I seem to have collected, I have one that holds 18 pots securely in a shaped tray. That is the exact number of small plants I bought yesterday. Due to my tomatoes, chillis and peppers deciding not to germinate, I bit the bullet and bought some seedlings – 3 moneymaker tomatoes; 3 gardeners’ delight tomatoes; six hot chillis; and 6 capsicum or sweet peppers. The pots they arrived in are tiny, so the really needed potting up as quickly as possible.


The job didn’t take too long and was quite simple, but for those who have not moved a seedling from one pot to another before, perhaps a bit of explanation wouldn’t go amiss. For those of you who are old hands at this, then please feel free to ignore the rest J
First off, you have to decide what size of pot you are going to move the seedling into. I could have moved mine straight into the pots that they will finish their growing in, but decided in the end that moving them to an intermediate size would be better, as they would then get ‘fed’ twice – once now and then again when I move them to their final pots. The nutrients in compost only last so long and can be washed out when you water the plants, so intermediate it is.


Put a couple of handfuls of fresh compost in the bottom of the pot. To ensure the plant is not planted too deeply (it should only be as deep in the compost as it is in the original pot, otherwise your plant might rot), you can take the seedling, still in its current pot and place this in the new pot to check for depth etc. 

Once you are satisfied that the seedling will be at the right depth, remove it carefully from the old pot. The best way is usually to put a finger either side of the plant, then tip the pot upside down. If the plant+compost doesn't slip out immediately, give the sides of the pot a little squeeze, which should loosen it. In the case of the these seedlings, they have been planted up in threes, so tipping them upside down is not an option. Instead, remove them with a good amount of compost still attached to the root, using a small indoor trowel or, if you don't have one, use a normal tablespoon from the kitchen. The point is that you do not handle the seedlings by their delicate stems as these can be easily damaged.


Place the plant+compost from the old pot into the new pot and fill round the edges with more fresh compost. Firm it gently and keep topping up with compost until the old plant and the new compost are level. Water thoroughly, and if the compost sinks a little, add a bit more to top it up. Multiply by 18. Don't forget to label your plants in their pots. Job done! 


[Apologies for the poor quality of the last photo - I will try to take a better one tomorrow]. 


(Don't forget to check out my forum too: http://homegrown.forumotion.co.uk/If people don't post then the community won't grow)

Saturday 30 May 2015

Saturday Shenanigans

The wood is here!

With the finalised measurements, checked, checked again and rechecked, I finally went to Atkinsons to get the wood for the window frame this morning. While I was there, I also got the boards for the top of the long bench under the window – 27 of them, at 365 x 150 x 19, treated fence boards. And the nice surprise at the end was it cost me about half what I thought it would. Can’t complain about that!

As an aside, if you want to ensure your measurements are correct, draw a 2-dimensional picture of the frame on paper (or the computer if you are clever like that – I’m not, so paper has to suffice). Write the length of the longest part; then draw in the uprights. Underneath each upright, write the thickness of the piece – in the case of my window frame, the longest piece is 4085mm and the upright measurements read 44 + 19 + 19 + 44 + 19 + 19 + 44 – that’s three heavy duty uprights and four thinner ones (two each side of centre). Then mark in the width of the ‘holes’, the spaces there the glass will go: 646mm x 6 (as there are six window spaces). When these are all added together, they come to 4084, because it is pretty much impossible to divide the 1mm remainder in half! But 1mm is not going to be much of a problem in the grand scheme of things. Anyway, if anyone adds them up and comes to a different answer, please keep it to yourself, as the wood is now cut!

Getting home was fun; the two longer planks wouldn’t fit in the car – well, they are over 4m long! So we had them sticking out of the passenger window. I was glad to get home without mishap.

After a quick bite to eat, I went out again to get the bitumenised corrugated sheets for making the compost bins. Each sheet is 2000mm long and I got four of them. Two of them will need cutting in half; I only need three half sheets, but it isn’t possible to buy 1.5 sheets in the shop! I was quite looking forward to putting the bin together and installing it in its permanent site – but I had under estimated the amount of preparation work needing to be done.

The bin is going to be a double bin (ie, two compartments) so I fill one, then while using that, I fill the other. It is going to stand against the end wall of the garage. Last time I really looked at that area, there were just some old bits and pieces to move – large pieces of wood, and some clear plastic corrugated sheeting (I intend to use that as a ‘lid’ for the compost bin). All I needed to do – or so I thought – was move the heap, dig out the area to make sure it was reasonably flat, then put the bin together and put in place. How naïve was I? while I wasn't looking, the whole area has become overgrown with nettles and I certainly don’t remember all those brambles!


OH and I therefore spent the latter half of the afternoon clearing nettles, 


brambles - pulling up some hefty roots in the process, 


old bits of wood, concrete breeze blocks 


and some shaped wall capping stones that are original to the house – not sure where the wall was that they used to cap, though.


The only casualty was me - somehow I can't seem to pull up nettles without getting stung. Ouch! 


I pull the nettles by hand rather than cutting them down with the shears, because that usually pulls up some of the root too and weakens the plant. It also doesn't leave any green part behind that can feed the root and restart into growth.

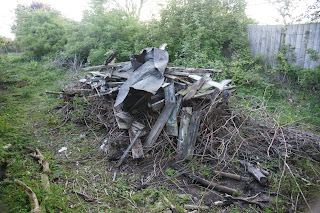
Altogether there were four capstones, two concrete blocks, half a dozen huge pieces of wood (some so rotten they fell apart when dropped) and several pieces of plastic sheeting.
And that doesn't account for all the nettles and the massive bramble roots we dug out.


Anyway, the first part of the job (clearing the space) is almost complete. 


The next stage is to ensure the roots are all out, that the area is relatively flat and then the bin can be constructed and placed.


Friday 29 May 2015

A Cold and Rainy Day Friday May 29th

What to do when it’s raining outside

(and you have holes in your greenhouse roof!)

Obviously working in the garden is out of the question, especially when the rain includes quantities of ice (hail and almost sleet)! (I hope my seeds are okay – it’s the end of May and still almost too cold for sowing things).

So it’s been a day indoors, and running out to the greenhouse and back to take some more measurements. Sadly, it has all been numbers, so there are no photos to show, but I have added a picture showing a similar bench to the ones I will be constructing.


So it’s official: the internal measurements of the greenhouse are – 3035mm from front to back x 4100mm side to side. The metal frame (angle brackets) which form basis of the long bench under the window is (should be) covered with boards 150mm x 635mm. To cover the whole of the top with boards I will need 27 of them, which should leave a small gap at one end for the vine trunk.

I need to make two other benches for the end wall and back wall. The bench on the end needs to be 2400mm long x 635mm wide; the bench on the back wall needs to be 3600mm x 635mm. I might need to make an adjustment on the length to allow for the old brackets for the window openers, which I don’t want to remove from the wall.

There are two ways of making these benches and I haven’t yet decided which is going to be better. I think it is only a matter of cost, so the decision might well be made on which way is cheaper. If anyone has anything to advise about one way being better than another, I’d love to hear it.

So, the two ways for making the top: 

  1.  Make a box frame, 365mm x 3600mm. This will be attached to the four corner posts. Add another long length down the middle between the two sides to support the slats which will run the short way from front to back. Two or four more posts can be added along the length, as the bench is so long.
  2. Alternatively, make a box frame as before and add supports across the width at intervals. Then run the top slats lengthways, from side to side. 

I am not sure there is anything really different about these two methods structurally speaking, but as I said, if anyone knows why it should be one way rather than the other, please let me know.

Finally, the window frame is calculated to my satisfaction. The outer frame will be made from two lengths of 4085mm and three uprights (one at each end and one in the middle) of 892mm. This takes into account the difference in thickness between the wood I am buying and the size I was expecting.

Between the end and the middle will be two further uprights, four in total (two each side of the centre), measuring 892 x 95 x 19mm, giving three window areas to be glazed, so six altogether - three each side of the centre. Each space measures 646mm wide x 892 high. The glass will be that measurement minus a little for easing (usually around 3-6mm.

The glass will sit against an inner frame made from wood that is 70 x 14mm. Again, this frame will take the form of a simple box and will be attached to the support boards. The frames for the windows will be 646 x 868mm.

Once the frames are made and in place, then they will be painted with some exterior, wood preserving colour (probably pale green) and then the glass will be added. I am still not sure whether I want wooden beading or putty to hold the glass in place yet. But plenty of time to sort that out when I get to it.

And the best news, I went to check the inside to see what support I will need for the roof beams – and I don’t need any whatsoever. The front of the roof is attached to a beam (which will need replacing before I do the roof) that crosses the whole of the front of the greenhouse and is attached to the wall at either end. In addition, the two centre rafters are attached to the metal brackets from a bygone era (see the picture on a previous post) and these are attached to the wall below the window. So none of the window frame touches the roof at all. Woohoo!


Rain and a Review

Rain and a Review

It’s raining today, so I thought I would do something slightly different – apart from number crunching to ensure all the measurements are correct for the greenhouse window frame. So, I decided that once a month, or more often if I feel like it, I will do a review of the blogs I have on my blog roll. It is one thing to have them listed there, but quite another to know the content and say whether or not they are worth visiting. Otherwise, you could be forgiven for thinking I just added them for show!


So, today, I’d like to introduce you to Richard. I have never met him face to face, but I feel like I have known him for years, which in a way I have. I first came across him in about 2004 when I happened upon a website/blog called ‘Down the Lane’. I was thinking of growing my own veggies and downshifting/the good life and this site came up in the search.

From the start, I was interested in what he had to say. He had chickens and a veg patch and had downshifted – out of the rat race, to a more relaxed way of life, if you can call it that – seems he is busier now than he ever was before he gave up his day job! He also had several ideas about how to make additional income to pay the bills, while not actually having to go to a 9-5 + commuting time job. And he had personal hands-on experience of living a frugal, but not boring, lifestyle.

Richard includes the story of how ‘Down the Lane’ (affectionately known as DTL for short) was born: he had decided to start a gardening business to make ends meet. The local pub landlord asked him to mow his grass. From there, he got referrals from the landlord, who said ‘I know a chap Down the Lane who might be able to help you’. And so ‘Down the Lane’ became a bit of a buzzword and eventually the name for Richard’s website.

Many people equate being ‘frugal’ with being a skinflint, or a Scrooge. They cannot see there being any fun in having to scrimp and save. But the reality is, frugal living is not all about worrying where the money is going to come from to pay the next essential bill. No, rather it is a diverse and interesting lifestyle that makes good use of your creativity and yet allows you to be master of your own time.

The DTL site gives excellent information on a wide range of topics – frugal living, chickens, JOGLE…

JOGLE? Oh yes, didn’t I say? Richard cycled from John O’Groats to Lands End at the young age of 64! And then blogged about it too, so others can enjoy the experience vicariously.

Anyway, back to the list of what the site offers: earning extra money is right up there, with several articles on different methods (he doesn’t mention knitting, or quilting for some reason!!); vegetable growing month by month; Kent County Cricket Club; and growing up in the 50s and 60s; visiting Nepal (twice). Like I say – diverse!

Do I recommend the site? Oh yes! There are over 1000 pages on the web site now and each one not only gives useful information, but shows Richard’s own personal view and you can see that he has actual experience of what he writes about.

So, you want to visit the site? You can find it Down the Lane

And there is also a related Facebook page


Great people, lots of answers to your questions about frugal living, chickens, vegetable growing etc. Worth a visit any day J

Thursday 28 May 2015

Measurements and frustration Thursday May 28th

Measurements and frustration

It appears my local Atkinsons is going to be best value for money when buying the wood for the greenhouse window frames. Unfortunately, they didn’t have everything I needed in stock, so I have to order it. On the positive side, I can get (when they have some), wood that measures 4.2m, so I don’t have to make two frames after all; I can do it all in one. However, they don’t have 25mm thick pieces, they have 19mm; and they don’t have 12 mm, they have 14mm. Their ‘2 x 4inch’ wood is actually 95mm x 44mm. So it’s back to the drawing board to ensure all the pieces are the right size when cut. I will be getting them to do the cutting as they have the proper cutting gear, whereas I would have to use a hand saw.

It's not a brilliant photo, but this is the basic shape:


Each of the spaces will have another frame inside it, not as deep, against which the glass will rest.

Basically, the frame is two long pieces, one at the top and one at the bottom. These measure 44 x 95 x 4085mm. At each end and in the middle will be a total of three uprights, also 44 x 95mm, but only 892mm high. Between each end and the centre will be four (two each side of the centre) further uprights, each measuring 19 x 95 x 892mm.

That will make the basic frame, leaving six holes where the glass will eventually fit.

There are (at least) two ways of making something firm for the glass to butt up against (otherwise it would just fall straight through!!). One is to rebate the uprights, using a router; the other (and simpler for me) way is to add a further frame inside each window space. For this I am using wood that measures 70 x 14mm. It is actually round edged skirting and I will use it to form a basic box, which will be attached to the uprights. The glass will then sit against that (and a layer of silicon sealant) and have putty or beading on the outside to hold the glass in place.

They did give me some samples so I could see what it looks like.


The largest bit will form the top, base and three uprights; the middle sized bit will form the four other uprights; the slimmest bit will form the inner frame.

I hope that makes sense! To me, if not to you!!

Compost bin

I costed the wood for the compost bin while I was at it. It seems that a bin 8’ x 4’ (2.4m x 1.2m x 1.2m) with a central divider (making it two bins next to each other) will cost about £90. And that cost does not include the corner posts, as I already have those. £90 seems excessive for something that is really only going to hold rotting garden rubbish! So instead, I have checked prices for corrugated bitumenised sheets. Wickes is the place to go for those apparently and even though my nearest Wickes is 12 miles away, it is still cheaper than buying the wood AND it will last longer – so winners all round, really. It will cost me about £65 which is a much better option. Each bin will measure 2m x 1m x 1.2m, so slightly smaller, but should give plenty of compost; I might even have a hard job filling it.

Just as an aside, I was sent to ask about corrugated sheets to Screwfix, which surprised me. If, like me, you thought Screwfix sold, well, screws and fixings, you would be in for a real eye opener if you visited one – they seem to do just about everything, including the kitchen sink!!

Gardening

So I finished off the day by planting more seeds – carrots and beetroot; cutting back an overhanging tree branch; and planting my peas. 

Before I could plant them however, I had to cut back a branch of an overhanging tree, which was hanging so low, the support for the peas and beans would not fit in place. Well, yes, I admit it, OH actually wielded the chain saw!

Before:


After:


I have a knocked-together-in-a-hurry structure, comprising uprights, cross bars and wire netting, for the peas to grow up. It’s in poor condition and the wood is not really sturdy enough, but I hope it will last out this season, then when there is less to do outside, I can set about making a replacement. Maybe next autumn/winter. 


Wednesday 27 May 2015

This and That: Wednesday May 27th

This and That

Today has been ‘a bit of this and a bit of that’ day. The weather was threatening to rain this afternoon, so I decided that burning the bonfire had better happen this morning rather than waiting any longer. Besides, it was certainly big enough!


Then, the vegetable patch was in dire need of attention, the re-measuring for the greenhouse window frames needed doing, and I decided to clear the rest of the floor of the former potting shed, as I thought it would make a good sized space for actually creating the frames when it comes to it and anything else I want to build.


So just in case you were beginning to think that this blog was about greenhouse renovations and nothing else, I did all of the above.

I started, enlisting help from my OH, with clearing the last of the burnable debris from in front of the greenhouse and in the old potting shed, and throwing it on the pile to be burned. Thankfully, there was very little wind and what there was, was blowing away from the nearby houses, where people had their washing out on the line. The fire soon took hold and it wasn’t long before the pile was reduced to ashes. It was pretty hot too!

And we're off:


Roaring fire:


Smouldering ashes:


Once all the rubbish was cleared, it made a proper space to stand in to re-measure the window frames. You know what they say: measure twice, cut once. Well, my height measurement was spot on (both ends of the greenhouse), but my length measurement was 5mm too short. That’s only a ¼ inch, so not the end of the world, but if it had been ¼ inch too long, it would have been difficult to get the frame to fit in the space.

After lunch, I decided that the vegetable patch was next on the agenda. It was becoming overrun with weeds again. I had been away from home for all of April and some of May, which isn’t the best time to be away from the garden really, but it couldn't be helped. So I needed to tidy up.

The paths are completely overgrown:


And between the deep beds too:


The slope here in front of the low wire fence is going to be my future herb bed - as you can see, it is going to need a lot of work before I can plant anything:


I hoed the weeds between the rows of growing vegetables. Then straw mulched the potatoes:


Meanwhile, OH cleared the paths between the deep beds.


The sky clouded over ominously and we needed a drink, so we stopped work at that point. But tomorrow is another day J

Tuesday 26 May 2015

It's Gone!

It’s Gone!
(No, not the greenhouse)

In some of the previous photos, you might have noticed that the old shed had one wall still standing – if you can call it that – more like hanging on by a thread, if the truth be told. Anyway, it was pretty dangerous – being old and heavy, it could have done some serious damage if it had landed on someone. In case you missed it, here's a reminder:


So despite this being the greenhouse project and not the shed project ;) I decided (with a lot of help from OH) to take it down. In addition, I wanted to keep the back panel in place if at all possible. The old shed was an add-on. The garden wall that extends from the front of the garage was not actually high enough, so when some previous owner decided to build the shed, they had to create a panel to raise the height of the wall to a suitable roof height. Anyway, it is now less likely that the wall will fall down and less likely that the panel will collapse with the weight of the wall hanging off it.


Inside the shed there are two brick pillars. They used to hold up a sink (yes, there is a drain beneath the debris between the pillars).


The sink is now in pieces on the floor. This happened some time ago – local youths ‘having fun’ as usual L


So we are about ready to have that bonfire – the pile is quite….erm…..high!


Why not pop over to our discussion form too http://homegrown.forumotion.co.uk/

Monday 25 May 2015

The Greenhouse Project_Monday May 25th

Tidying up

I had thought about starting to make the window frames for the greenhouse today. But instead, I watched the three Queens (Victoria, Elizabeth and Mary 2) celebrate the 175th anniversary of the start of Cunard, on the Mersey, so afterwards, I thought I would clear up the mess that was accumulating outside the door to the greenhouse.


The door leads into what was originally a potting shed. It was wooden and, being almost as old as the rest of the buildings, it has more or less completely rotted away. 


There is a lovely tiled floor (more quarry tiles) underneath all the debris, but temporarily, it has become a dumping ground for rubbish from the greenhouse. It was time for another tidy up. This photo shows the lovely tiled floor after the junk had been removed:


Anything that could be burned was put on the bonfire pile, ready for burning at some stage; the rest was thrown in the bin or recycling. Very little was salvageable but I did manage to save a couple of strong (and long) boards and an old window frame. These are just two of the bags of rubbish ready for taking to the tip:


I've only cleared half of the old shed so far. The side of the building is falling over, which makes the other half of the floor unsafe to work on. Plus, it was my intention only to clear enough to be able to reach the door to the greenhouse. After all, this is the 'greenhouse project', not the shed project!

The Greenhouse Project_Sunday May 24th

Greenhouse Project: Sunday


The next job was to tackle the overgrown vine. It is probably 100 years old. A couple of years ago, I decided to cut it back; since then, it has grown lots of twiggy shoots and very little else. 


So I took the secateurs and loppers and set to, cutting back everything that was too thin, or dead, or in the wrong place. I was left with three shoots with leaves on that were more substantial than the others and placed so they could be tied conveniently to the cross beams of the roof. 


Some of the branches had grown out through the holes in the roof (in fact, they probably created some of the holes) and behind rafters and roof beams, pushing them out of place. It was hard work, but I managed (with a little help from my significant other) to remove them all and clear the roof. As the corrugated plastic panels are going to be replaced, I didn't clean off all the moss and other light debris, so the greenhouse is still a little dark, but from outside, it looks so much better. Pictures are of before and after:


Of course, when I had finished, I had to clear the floor again! But I forgot to take a photograph of the newly messed up floor, so you will have to use your imagination.

Discussion forum: homegrown.forumotion.co.uk